Monday, February 22, 2010

My Burlap Epic Fail Turned Mod Podge Miracle!

I have had this little wrought iron corner lamp stand/shelf for our entire married life. I think that it was the cheapest thing that I could afford at the time that fit a corner in our house that needed some extra light. Anyways...the lamp shade that I have on it isn't the one that it came with...the original one sits on top of the lamp that is sitting behind my newly remade bookshelf, which you can see here. I found that lamp in our garage without a shade and switched it out with the one from the corner shelf...okay, so the whole point of this is that I didn't like this lamp shade, which I referred to as the "burnt chicken"...and so I set out to make a new one, using the current shade as the base.


Lamp shade before...


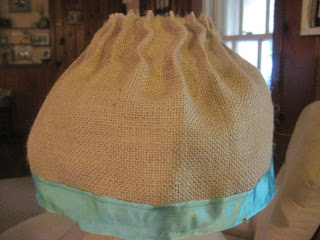
...and this is my Burlap Epic Failure! Somehow this idea looked great in my mind's eye...obviously my mind's eye was blind! This is so {UgLy}...even my husband was telling me how hideous it was, and I had to agree! Y-U-C-K-Y!!! It didn't help that I had cut the burlap too short, and that I spaced the ripples too far apart. I can describe this in one word...DISASTER!!!


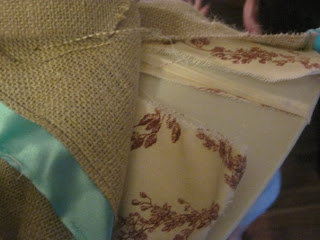
However, if I hadn't burlapped my lamp shade, and then tried to rip off said burlap, I would have never know that I could also tear off the "burnt chicken"...I thought it was a permanent part of the lamp shade! SO glad that I failed so that I could try again...with a renewed vision of how I wanted my lamp shade to look.


Here is my Mod Podge Miracle! Isn't she a beauty?!! I simply cut out some sheet music that I printed off of the internet and painted the Mod Podge directly on the lamp shade, and then again over the music after I stuck it on the shade. I tucked the overhang underneath the shade. I might add some decorative fringe to the edges of the lamp shade, but for now it stays like this.


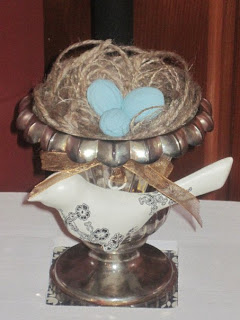
And, while I was re-doing my lamp shade I figured I'd have some fun and re-do a few things on the shelves as well. Like this sweet little nest that I have all tucked inside a silver urn, which is nestled inside of a photo frame. The sweet little birdie was a Hobby Lobby find.


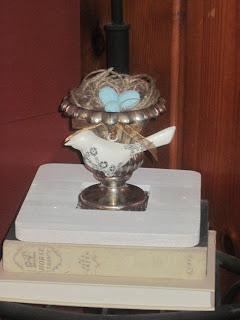
If you want to find out how to make your own Robin's Eggs, you can go here. For the nest I simply balled up some loose burlap threads and some jute twine, and then glued them together in a nest shape.


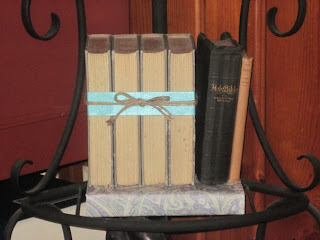
I love how the edges of the pages look on these antique books. They are from my great grandmother's home. All the books sit atop a new book that I covered with scrap book paper to match my color theme I have going on here.


I picked out some songs that are specially dear to me to cover my lamp shade...I love that doing that gives it extra special meaning.


I am linking this up to:

Make it for Monday @ Cottage Instincts
Met Monday @ BNOTP
Make Your Monday @ Twice Remembered
Get Your Craft On! @ Today's Creative Blog
Penny Pinching Party @ The Thrifty Home
Show & Tell Every Wednesday @ Blue Cricket Design

Get Your Craft on Thurs @ Life as Lori
Strut Your Stuff Thursday @ Somewhat Simple
Transformation Thursday @ The Shabby Chic Cottage
I Made It! @ Everything Etsy


Show & Tell Fridays @ My Romantic Home


Thursday, February 18, 2010

What a simple coat of paint can do...

When my husband and I married almost 7 years ago, we somehow acquired this (ugly) little bookshelf...I think that it might have been his as a child, and as far as holding books go, it's great...but it does lack that aesthetic appeal...the faux wood paneling is not exactly pleasing to the (mainly {MY}) eye! So, yesterday I decided to spruce up my little shelf by simply painting back behind the shelves. I am in full-blown nesting mode...and my due date is still 4 months away!...but since I am probably not really supposed to be around paint fumes much I took the easier route of just painting this shelf enough to keep myself from going crazy. Maybe someday I'll paint the whole thing, for now though I am satisfied! I mixed up some of my craft paints...a variety of aqua, pale blue, navy, sea foam green and even a bit of brown to get the color I wanted.


This is the before...

...and here is my after! I rearranged my collection of vintage books and other vintage odds and ends to fit in better with the newly painted "back splash" on my bookcase. The curtain hides some of our board games, and just a few of the (too) many medical books that my husband has.


The top shelf holds some antique books from my husband's grandfather who was a preacher, and a plate that my sister gave me for a birthday years ago.


I really love the color that my paint mixture turned into! Very fresh looking! I turned a lot of the books around because all of the different colors of the spines were too much. I wanted a more neutral palette.


Some more vintage books and a handmade pottery dish that my sister, Gloria, made when she was little...inside the dish is a picture of sweet Gloria herself...back before she was all grown up! The pedestal I purchased off of Etsy from sweet Miss Mustard Seed!


My red berries in front of yet some more vintage books...the small red book on top is a Bible that is over 100 years old!


This shelf holds a collection of books and other mementos from my late great-grandfather...pictured in the small frame. He was a beloved physician and a wonderful man, and I have so many sweet things from his and my great-grandmother's home...one of my favorite possessions acquired from him is my antique wrought iron bed, which I showed you here.

So that's what a simple coat of paint can do...with a little tweaking here and there with the accessories! Hope you enjoyed!


I am linking this post up to:

Get your craft on Thurs.


giveaways


Furniture Feature Fridays

Tuesday, February 16, 2010

Before & After - A Face Transformation!

Today I am joining the other brave women who have dared to get their face on - inspired by "Get Your Face On" by Beth @ the Stories of A 2 Z. If you would like to see the post that was the inspiration for this party where Beth shows us her (beautiful) before & (gorgeous) after when she decorated her face, please just click here. Beth is a huge inspiration to me when it comes to crafting and decorating, and it seems as though she is not only good at decorating her home...she is good at making over her face too! ;) Thanks, Beth, for putting on this fun (although slightly scary) party. It's not every day that you just let people see you in the "before" mode...although, I think that we really shouldn't worry that much about what people think about the real us...I am quite confident that I am worthy or "worth it"...not because of how I look, but because of WHO I have inside of me---Jesus! He is all I need to feel beautiful and special...and having a hubby who loves me just the way I am helps too! Okay ladies...here I go...extra 25 preggo pounds and gaining (yikes!)...in all my baby-glowing glory!


Fresh out of the shower...which is in itself an accomplishment! ;) You moms of little ones know how hard it is sometimes to squeeze that in! And, speaking of little ones, for my facial moisturizer, I simply use J & J Baby Lotion. For me it works the best...although I may need to "grow up" and find one to help with those smile lines that I see creeping up around my eyes!


My face after adding a bit of matte powder (Cover Girl) and some Maybelline Mineral Power loose powder blush. (I really don't like wearing foundation, and never have...it always feels too thick on my face).


Whoa, there's my eye! I added a little (elf) black eye liner (which I sometimes wear, sometimes don't) and some eyeshadow (Cover Girl Shimmering Sands) and Maybelline Mascara...Colassal in very black for the top lashes and Discovery (the slim mascara) for the bottom lashes...the larger brush always seems to smeer onto my skin when I try it on the lower lashes. Oh, and I also smudged the eye liner with a Q-tip before adding the eye shadow...I like the "smoky" look I guess! I put just a tad of eye shadow underneath my lower lashes too for some extra sparkle!


Okay, view from the top of my eyelids/lashes...don't pay attention to my nose...I think that I need to use some of those biore nose strips! Haha! I'll blame any and all skin problems on my pregnancy! ;)


My face after "adding" my eyes, and after putting on just a bit of Burt's Bees chapstick to moisten my lips a bit.


And, to finish up I just added a bit of Cover Girl's lip stain to my lips to add a bit of color and then some Neutrogena lip gloss for a bit of shine.


Viola, I'm done! Now, my hair...that's another story. I am extrememly low maintenance with it...it is usually just air-dried, brushed and then either put up in a pony tail or held back with a head band. Someday I'll add making my hair all pretty to my beautification routine!


The few simple (and inexpensive) things that I use on my face. Sorry, no major beauty tips here, but this is what works for me!
Thanks again Beth for encouraging us and inspiring us to do this! Blessings!


I am linking this up to:


Like Candy in a Jar {Ribbon Storage}

Back in the fall I was inspired by a post from Miss Mustard Seed...Inspired Ribbon Storage...which you can read here. I am a ribbon-a-holic, I just love all the beautiful colors & textures. I love grosgrain ribbon and rick-rack probably the best...just so simple and playful. Anywhooo...I had a drawer in my craft room (aka the dog's room/our sun room) that was stuffed with spools of ribbon, much of it unspun from the spool and tangled up in a huge jumbled mess. My toddler had found that taking ribbon off of the spool was just was fun as unrolling the toilet paper(!), but that didn't exactly make for easy access to my ribbon while I was crafting. So, during the last week I've been working on untangling all that ribbon & organizing it, using the inspiration from sweet Miss Mustard Seed as my guide.

I don't have any before pictures...trust me, it wasn't pretty...but here are some of my afters!


I love my "Inspiration Desk"...you can read about how I organized it here.


I bought two of the jars (the two larger ones) at Hobby Lobby when they were half off. The smaller one I already had - it previously held the most delicious salsa I've ever eaten.


I painted the larger jar's lid so that it wasn't so shiny and silver. I like the matte aqua blue much better.


I added some cute scrapbook paper to the lids of the mason jars.


I also bought these sweet little clothespins at Hobby Lobby...I didn't have any lovely vintage ones like Miss Mustard Seed...but these do the job quite nicely. I just rolled my ribbon up and then pinched it in the center with the clothespins.


This smaller jar houses my ribbon scraps. Waste not, want not!


Wider ribbon is stored in the bigger jar...as pretty as candy (and way fewer calories!!!).

I am linking this up to:


DIY Day @ ASPTL


Photobucket

Penny Pinching Party @ The Thrifty Home

"Show & Tell" Wednesdays @ Blue Cricket Design


Monday, February 15, 2010

Super Easy {belated} Valentine's Craft

I know that {LoVe} day was yesterday, and I should have posted these little pretties sooner...but I only finished them up yesterday afternoon and then rushed them over to my aunt's house to give to her and my cousins...yes, I am a Valentine's Day procrastinator, but at least I did get them delivered on the right day!

I have been saving baby food jars to use as different craft ideas are born in my head...and this one was super-duper easy. Just peel off the label, wash out the jar and lid & wipe dry. Wrap some cute scrapbooking paper around jar and attach with glue. Paint lid desired color and add a bit of ribbon around the edge for embellishment. Stick a cute bow on top, fill jars with treats, and you're good to go!


My sweet little Valentine's, all ready to go...and if you're interested about reading about where I got that adorable stand that my Valentine's are on, you can read that story here!


Happy President's Day!


Saturday, February 13, 2010

Look What Came in the Mail!

Yesterday I received a knock on the door, and when I opened it up I saw a package waiting for me on my front porch...when I looked into the box, this is what I found inside...cute, right?!! A special delivery straight from Miss Mustard Seed herself...want to see what's underneath that cute wrapping???


Inside was this beautiful cake pedestal (accessories not included!)...isn't she just gorgeous?!!!


Ever since I saw this on Miss Mustard Seed's blog, I have wanted it as my own...


...and then when I saw it in her Etsy shop, I knew that it would be mine! I wasted no time in snatching it up!


I love the light aqua blue color it's painted with the hand painted white detailing.


Picture proof that this is from the painting genius herself! Thanks so much, Marian, I will treasure this!!!