Tuesday, November 24, 2009

Chubby Baby Car Seat Cover GUEST GIVEAWAY!!!!

With a new baby on the way you can bet that I've already thought ahead to new baby gear...although if we have another boy we're pretty much all set. However, if a little girl comes along it would be sort of nice to have a few things that are more "sugar & spice"...which is where this guest giveaway comes in! I just saw this today over at Grosgrain, and immediately knew it would be the perfect way to save some money and have a new look at the same time! If you want to check out this very creative idea for recovering car seats just click on the link below the pictures!


Thursday, November 19, 2009

Thanksgiving Tablescape Preview!

I have been working feverishly the last couple of weeks on making everything for my Thanksgiving Tablescape. I made the wall decor a week or so ago, but that was only the beginning. Since then I have made the table runner, 12 napkins, 12 napkin holders and 12 placemats! And thank goodness (or unfortunately) after almost completing the very last placemat my sewing machine decided to quit on me! I put on the finishing touches with my handy dandy glue gun---though I don't know what I'm going to do since I was planning on a quite a few sewing projects for Christmas! Looks like a trip to the sewing machine repair place will be in my very near future! It figures that my machine would go out today though...it's been sort of a frustrating day. My sweet son has been a little pill! The check that I mailed off to the bank over a week ago never made it, so I can only assume that it got taken or lost in the mail---and I really needed that check! Plus, for some reason I am just super tired today. I guess this baby-creating business is really taking a toll on me! Anyhow, there's plenty to be thankful for today too - - - - - like my Tablescape!!! Okay, here we go!

---------------------------------------------------------------------

Obviously there will be more chairs at the table...and more place settings...just remember, this is a preview! ;)

The runner was by far the easiest thing to make. Just take a long length of burlap (mine is about 9 feet long to account for the extra leaf we'll be putting in the table) and cut it the desired width. Then simply pull off about 10 or so threads from each side to create a fringe and you're done!

I mimicked the red berries in the napkins with a few sprigs on the table & in the candle holder.

The three center jars house some cinnamon sticks, some vintage recipe cards passed down to me from my great-grandmother/red berries, and some wine corks. In the tops of the jars are tealight candles nestled in whole coffee beans. The two outside jars are dollar store candles with a bit the print fabric tied around them.

I really like how my placemats turned out! Too bad my sewing machine quit on me!

Aren't my little napkin holders cute?! Hot glue gun, baby!

I think I need more red berries.

Alrighty, y'all. That's it for now! I think I'll go take a break while my little sweetie is napping!


I'm linking this up to Tablescape Thursday at Between Naps on the Porch...


...and to Transformation Thursday at The Shabby Chic Cottage.

Wednesday, November 18, 2009

The Brass Hussy GUEST GIVEAWAY!!!!

I am a sucker for giveaways...and I just wanted to share this one with you! Just check out this cute little squirrel/acorn necklace! Isn't it ingenious! You can check out more fabulous one-of-a-kind jewelry by clicking on the link below the picture! Have a great Wednesday, y'all!


Tuesday, November 17, 2009

Hello to a New Friend & Holiday Potpourri

Last week I had to say goodbye to my dear old vintage oven/cooking range...you can read the sad tale by going here...but today I want to introduce you to my new buddy---my brand new oven & stove! There's nothing spectacular about it, but it works, which is something our old oven couldn't boast! I not really a fan of the modern more rounded chunky look that this oven has, but I don't want to complain. I am grateful that we have it just in time for Thanksgiving, and I'm sure my guests will be glad for it as well...otherwise it would have been frozen TV dinners cooked in the toaster oven! Okay, probably not, but I was going to have to use some major creativity if our oven hadn't arrived in time!

Right now as I'm writing this the wonderful aroma of the easiest ever potpourri to make is wafting through the air in our home. It is so simple that I'm almost embarrassed of how amazingly good it smells. Sometimes the simplest things are the best though, aren't they?! If you want your home to smell delightful for the holidays, all you need to do is get a small sauce pan, fill it 3/4 full with water and set it on the stove on low. Add the peel of one orange, about 1 tablespoon of whole cloves and about 6 cinnamon sticks. That's it! Let it slowly simmer all day and your mouth will be watering with the delicious smell that will permeate your home. Caution: Just check the water level throughout the day. I made the mistake of not doing that a few weeks back which resulted in my pot getting a 7 day soak before all the burned on gunk would come off!

Okay, ladies, I'm off to continue making my little pretties for my Thanksgiving table! Sneak peek to come soon! Have a great Tuesday!

-----------------------------------------------------------------------------------

The rounded top of the oven where the dials are keeps me from using it as a shelf like I did with my old stove...I miss that!

Since our new oven is quite a bit smaller (width-wise) I brought in a little round table to stick in the empty spot in the corner. I covered it with a vintage linen table cloth that I purchased a couple of weeks back.

Cozy little kitchen!

While I was eating an orange this morning I was inspired to make my potpourri. No sense in letting all that good peel go to waste!

This stuff smells so good you'll wish you could eat it!

Saturday, November 14, 2009

Saturday Nite Special!

Funky Junk's Saturday Nite Special

I'm participating in my first "Linky" party over at Funky Junk's Saturday Nite Special! I entered my Thanksgiving Banner post which you can read by going here...or just follow me over to Funky Junk Interiors and have a look-see at all the creative ideas posted by the beautiful people in blogland! Happy Saturday!


Ode to a Vintage Oven

Earlier this week I had to say goodbye to an old friend...our vintage enamel oven/cooktop. We have actually been living without the oven portion in working order for over a year and half, but we somehow managed to survive on meals cooked in the toaster oven or made on the stove. However, since I am hosting Thanksgiving for the first time this year, I figured that the toaster oven probably wouldn't cut it---I couldn't really see cramming a whole turkey in there! So, with the cooperation of our kind landlady, we decided to get a whole new oven & cooking range. I really hated to part with the old one, and I'm not really even sure how far it dated back, but it was old enough to have the parts that weren't functional discontinued...too bad! I LOVED the large cooking surface on the top & the vintage feel of the enamel surface, and even though almost all of the numbers had worn off of the cooking dials, I sort of liked that too. You could tell that lots of love had faded this old oven. I certainly gave it my share, coaxing it to bring forth hot meals for my family, gently wiping away any spills that managed to escape over the edges of pots and pans doing their duty to feed my sweet boys. Yes, lots of love indeed, and I miss my dear old oven---yes, even though it didn't work!

The morning of the oven removal I took some pictures - - - okay, I took lots of pictures. I want to remember this oven, and I'll probably send a few pics to my landlady as well...one of the first things that she said to us when we moved in was how much she loved that oven! I'm sure that she's sad that it's gone too!

So, to my oven: Thanks for all the hard work you've done over the years. I'm sad to see you go, but I will remember you and all the times we had working side by side!


I


Monday, November 9, 2009

My First Blog Award! Woohoo!!! ;)

Lisa over at Recaptured Charm was kind enough to pass along the Kreativ Blogger award to me! I first saw Lisa on Miss Mustard Seed's Furniture Feature Friday. She made over this beautiful table. Isn't it gorgeous?!! Thanks so much, Lisa! I am so excited to display my new award!!!


So here's the deal, I am supposed to

-Thank the person who nominated me for the award
-Copy the logo and place it on my blog
-Link to the person who nominated you
-Name 7 things about myself that people may not know...hmm, should be interesting!
-Nominate 7 creative (or should I say "Kreativ") bloggers
-Post their links
-Leave a comment on each of the 7 blogs

...so okay, 7 things you probably don't know about me...

1) Both of my pinkies are crooked---seriously, it looks like I broke them, but they were just made that way---and my son J has the same exact pinkies! They look pretty cute on his little hands though!

2) I could live on just drinking coffee and Dr. Pepper...although I am cutting down on the caffeine now due to my new little "bun in the oven."

3) I used to let our 100 pound labrador retriever sleep in the bed with me when my hubby was away...but he always squished me into the corner of the bed, so that had to stop!

4) I have always wanted to be a homemaker, from the time I was a little girl, and I am now living my dream!

5) I could have never married my husband if his feet had been ugly...okay, maybe I could have, but I'm just glad his feet look okay!

6) I love to make jewelry but rarely wear it---I am a minimalist when it comes to accessorizing myself, although I will wear earrings frequently.

7) I have 5 beautiful (and talented sisters) and one very amazing brother!

Okay, there are the 7 things! Now, onto my 7 nominees...

-Lynsey @ Yonder Way Farm...her blog is full of green-living, God-loving and all around inspirational posts...plus, she is an awesome photographer!

-Beth @ The Stories of A to Z...she is always so inspirational and transparent. She is a true "blog gem" and I always love reading her posts.

-Gail @ The Nurtured Nest...new to the blog scene, Gail is already full of helpful advice and her passions are homemaking, green-living and a love for family. Plus, she is my precious sister! Love you, Gail!

-Gina @ The Shabby Chic Cottage...stop by her blog, but also take time to check out her fantastic Etsy shop...Christmas is coming, y'all!!!

-Megan @ Megity's Handmade...she has a very inspirational blog, and also some cute stuff at her Etsy store...her handmade tassels are just gorgeous!

-Joanne @ Aprons Gone Wild...I can't remember where exactly I found this wonderful blog, but what caught my eye was her fantastic handmade aprons...and yes, you guessed it, she has at Etsy store! (Can you tell I'm in love with Etsy?!!)

-Marian a.k.a. "Miss Mustard Seed" @ Mustard Seed Creations...her blog is a huge inspiration, and although I haven't tackled any furniture re-do's just yet, when I do in the future I'll have plenty of ideas from her wealth of knowledge!

Thanks again, Lisa for the award! You're a dear!

*Grace*

~~~Thanksgiving Banner~~~

I want to thank those of you who gave your helpful suggestions about how to decorate my Thanksgiving Day table---I think that I will be able to incorporate many of your ideas and use a few tricks that I have up my own sleeve as well! ;)

Yesterday I went to the fabric/craft store, hoping to be inspired as I browsed the aisles for anything that caught my eye. I found a few pretty red berry branches, and some stuff to make my topiary, which I wrote about here, but nothing to really tie together a festive Thanksgiving table. Then I saw it, the most fitting Thanksgiving fabric, just begging me to make something out of it! I am not a huge fan of the traditional "autumn" colors---oranges, reds & yellows just don't do it for me---but when I saw this cute print, I knew that I could incorporate my favorite color, blue, in with the other fall colors! Woohoo! Using the floral print as my color scheme, I dashed about the store gathering bits of this and that to pull together what is going to be one really lovely table! I bought some blue burlap, which coordinates perfectly with the print fabric, and I am going to make a table runner out of that. The cotton floral print has already been washed, and I've already completed 2 napkins (of 12) out of that. I bought some pretty gold-ish felt that I am going to make place mats out of, and some green felt to make some leaf napkin rings out of! The red berry branches will go on the table, nestled around some candles and tucked into a decorative jar that I already have on the table. I think that's about it, but there could be more, you just never know...like my banner, that was totally unplanned, but a happy little accident made from the leftover fabric scraps! So here's a sneak peek of my Thanksgiving Day color scheme!


My easy sew (or no-sew if you prefer) Thanksgiving Banner. This could easily be made using fabric remnants and a glue stick!

Extra burlap provides a backdrop for my "Give Thanks"...simply printed off the computer onto card stock and glued right on the burlap.


I just love how this turned out!

Isn't the print just gorgeous! I love the "non-autumn" colors mixed in with the more traditional colors of fall!


Easy-cheesy probably 2 dollars tops decoration! Just the way I like it!

Oh, I was also picked for the Kreativ Blogger award, which I will post about as soon as I take care of my mommy-duties here at the house! Have a great day, y'all!

*Grace*

Sunday, November 8, 2009

Decorating for Christmas & My First Tutorial - A Shell Topiary

Probably a month or so ago, my husband asked..."when are you going to start decorating for Christmas?"...to which I replied "oh, the day after Halloween!" I said that as a joke, but in all seriousness, I really did want to start decorating early this year. The Christmas season is my very favorite, and it always passes all too quickly - so why not extend it by decorating early?!! So, today I started getting out my decorations, and tackled the mantle first. It probably will get some extra holiday love, but I wanted to get a few things up and the mantle is always the easiest place to start for me!
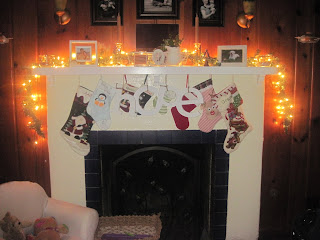
You may be wondering, why we have so many stockings, well each one has a special story to tell, from left to right...1) My husband's stocking, nothing too fancy, but I did hand stitch the name on it myself when I was pregnant and on bedrest with our first son. 2) Our sweet boy J's stocking, which actually needs to be switched out since he is going on his second Christmas! Woohoo! 3) Stocking in memory of our first precious son, who went to Heaven in December of 2003. 4) Stocking in memory of our second sweet boy, who joined his big brother in Heaven in September of 2004. 5) Stocking in memory of our 3rd child, also joining his/her siblings in Heaven, April of 2006. 6) Stocking in memory of our 4th child, who like baby #3 joined his/her siblings in Heaven April of 2007. 7) Stocking for our furry baby, our doggie, BoBo! 8) My stocking, lovingly handmade by my mother almost 30 years ago. And last, but not least, 9) Little bitty stocking hanging on mine to honor the newest little blessing in our lives! We're expecting our little miracle next Summer! So there you go, the stories of all our stockings!

Okay, onto my first tutorial about how to make a sea shell topiary! You will need 1) and assortment of sea shells, 2) a styrofoam ball - whatever size you desire, I used a small, 3 inch one, 3) some burlap or some type of neutral fabric to cover up the ball, 4) hot glue gun & lots of glue sticks, 5) something to place your topiary inside once you're finished. And, for ease of use, I temporarily used a rubber-band and a stick while I was gluing on all the shells, but removed them once I was finished. Okay, here we go...
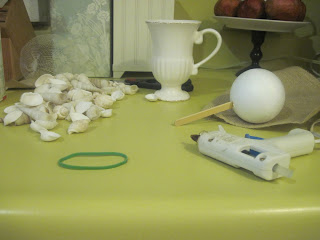
Gather all the necessary items in one place, carve out about 30 minutes of time and you're good to go!
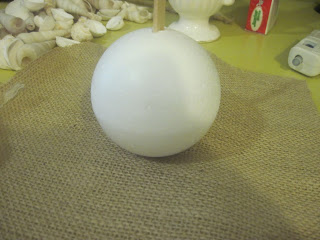

I started by placing my styrofoam ball in the center of a square of burlap with the corners trimmed off, and I secured the burlap with a drop of glue that was squeezed onto the ball.
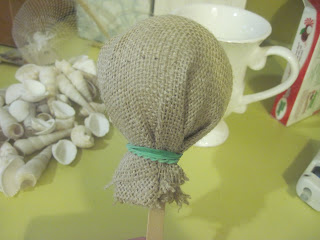


With a stick poking into the underside of the ball, tie the rubber band around the loose ends of the burlap, you could use of piece of string or even a hair band for this since you won't be keeping it on...use what you have readily available!
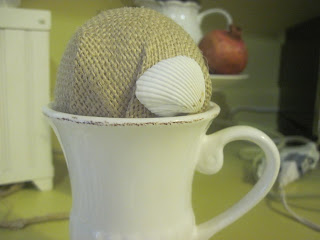


Place ball where you intend to display it to get a reference line for where you will want the shells to be. Glue one shell on, and then keep on gluing until you have a lovely mound of shells overlapping and placed topsy-turvy all over the styrofoam ball.
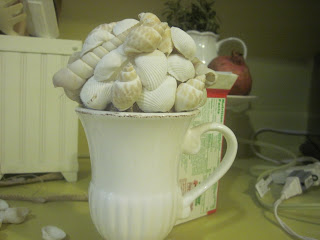


The end result should look something like this! Although, I wasn't happy with the container that I chose to host my sea shell topiary...
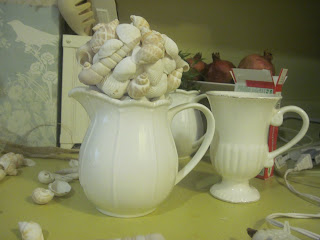


So I tried this one instead, and still didn't like it...
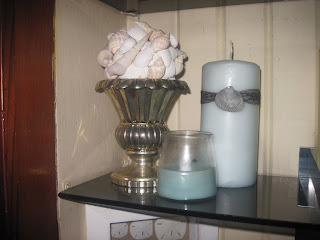


...eventually, I ended up using this! I replaced the other loose shells which were previously displayed in this vase, which I wrote about here. What do you think?!!

Have a great rest of your Sunday, and a blessed start to your week!

*Grace*